Spotify on an RPM based system (64 bits)

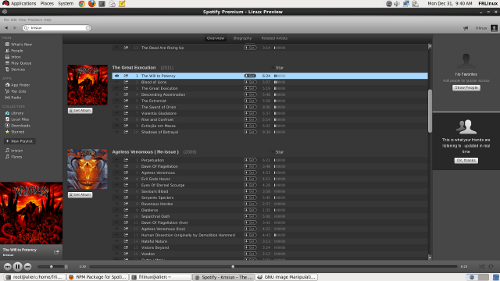
I recently registered with Spotify and wanted to listen to it on Linux. They have a preview client for Debian but nothing for RPM based systems. Funnily enough, they have an app for Android. This is a quick and dirty guide to get it running on CentOS/RHEL systems. You will need a PREMIUM subscription for this to work.

First, credits where they are due, I looked at this post on the community site. You need a Debian based system to convert the RPM or you will have to install alien yourself. Once this is done, go to the repository and grab the latest DEB for your platform. Then convert this (as root)

alien --to-rpm spotify-client_0.8.4.103.g9cb177b.260-1_amd64.deb

You then obtain an RPM you can install, you will need to install it the dirty way with nodeps. You also need to install a few dependencies:

yum install openssl098e qtwebkit
rpm -ivh --nodeps spotify-client-0.8.4.103.g9cb177b.260-2.x86_64.rpm

Now running the first next command will show you that a few libs are not in the right location, this is how to fix it on RHEL 6.3, other RPM based systems might require different lib names:

ldd -v /usr/bin/spotify |grep "not found"
ln -s /usr/lib64/libssl.so.0.9.8e /usr/lib64/libssl.so.0.9.8
ln -s /usr/lib64/libcrypto.so.0.9.8e /usr/lib64/libcrypto.so.0.9.8
ln -s /usr/lib64/libnss3.so /usr/lib64/libnss3.so.1d
ln -s /usr/lib64/libnssutil3.so /usr/lib64/libnssutil3.so.1d
ln -s /lib64/libplc4.so /usr/lib64/libplc4.so.0d
ln -s /lib64/libnspr4.so /usr/lib64/libnspr4.so.0d

All going well, the client should now have all the libs linked properly. You can then launch spotify and profit!

I think this is worth mentioning that this is a temporary fix as I believe official clients will eventually show up.

Building a home made NAS

This is the first part of a few posts on my experience on building a home NAS. This has been on my mind for a while but it should be noted that I am planning to run slightly more things with this than just your typical NAS, hence why I am not going for an ATOM. I will most likely be running logstash along with observium and other web related things onto it. I am dying to put that to use.

Now onto the hardware:

  • Intel Core i5-3450S 2.80GHz (Ivybridge) Socket LGA1155 Processor (65W)
  • Lian Li PC-Q25B Mini-ITX Cube – Black
  • Asus P8H77-I Intel H77 (Socket 1155) DDR3 MiniITX Motherboard
  • Corsair Vengeance Low Profile 16GB (2x8GB) DDR3 PC3-12800C10 1600MHz Dual Channel Kit
  • Noctua NH-L12 CPU Cooler
  • Arctic Silver 5 Thermal Compound
  • Nexus NX-5000 R3 530W Real Silent 80+

Now dying to get the hardware. First stop will be to install FreeBSD with ZFS, then I will be comparing this with CentOS 6 and ZFS. Have a few spare drives and one SSD, that should get me going for a while 🙂

Remote logs with syslog-ng and logstash

It has been a while since I wanted to test logstash as a central syslog-ng server. Turns out that it is dead simple. This is a quick guide so I remember about it the next time. I went for a VM on CentOS 6.3 which has syslog-ng and a few syslog-ng clients sending logs remotely via UDP. First, some considerations, my VM did require slightly more CPU and RAM than I thought it would. To have something stable, I recommend at least 2 VCPUs and 2GB of RAM. I also tested this setup with java 7.

First install and configure syslog-ng on the server, edit /etc/syslog-ng/syslog-ng.conf and add the following then restart the server’s daemon:

# note, you can use the IP of the server to bind ONLY to that socket
source s_udp {  udp(ip(0.0.0.0) port(514)); };
destination d_udp { file("/var/log/syslog/$HOST"); };
log { source(s_udp); destination(d_udp); };

Then you need to set the clients, again, install syslog-ng on them and add something like this in the same configuration file. Note that it must obviously match the IP of your server.

log {  source(s_src); destination(d_udp); };
destination d_udp {  udp("192.168.66.66" port(514)); };

Moving onto logstash, download the latest from the main page (used 1.1.1 here) then put that in a directory (used /opt/logstash). Create a configuration file for logstash, i used /opt/logstash/logstash.conf. Mine contains pretty much what is from the quickrun guide. Note that on the syslog server /var/log/syslog must be a directory, i then receive logs from remote servers based on hostnames.

input {
  stdin {
    type => "stdin-type"
  }

  file {
    type => "linux-syslog"
    path => [ "/var/log/*.log", "/var/log/messages", "/var/log/syslog/*" ]
  }
}
output { 
   stdout { debug => true debug_format => "json"} 
   elasticsearch { embedded => true }
}

To start logstash, I use the following line: /usr/java/jre1.7.0_09/bin/java -jar logstash-1.1.1-monolithic.jar agent -f logstash-complex.conf — web –backend elasticsearch:///?local.

Now keep in mind that this is java, so it might take a while before the web interface becomes available. When it does, go to your server’s IP like this: http://192.168.66.66:9292 then query for either of your hosts reporting logs or try the generic query on the page.

Nothing more, you have a free splunk which has so many inputs and outputs that it is almost indecent. Expect my next post on using the output to get this into graphite.

Getting to boot your system when nouveau kernel panics

I keep forgetting this, so here goes. First off, boot it up right:

rdblacklist=nouveau nofbmodeset init=/bin/sh

Then create ”’/etc/modprobe.d/blacklist-nvidia.conf”’ and put this in there:

blacklist nouveau

Last step is to rebuild your initramfs, here is an example on a CentOS 6.3 box:

dracut -f /boot/initramfs-$(uname -r).img $(uname -r)

Reboot and profit.

Getting to like Ubuntu 12.04 LTS again…

This post follows my previous where I blogged on replicating an ubuntu repo locally. As I had a few stations to install using the same method everytime, I have decided to document the setup to 12.04 LTS.

First things first, disabling Unity and reverting to Gnome Classic (log out then select gnome-classic from the login menu):

apt-get install aptitude
aptitude install gnome-session-fallback
/usr/lib/lightdm/lightdm-set-defaults -s gnome-classic

The next thing I got to do is installing all the restricted codecs to make the station usable with all the junk on the internet:

apt-get install ubuntu-restricted-extras ubuntu-restricted-addons

Next is to install libdvdcss so it can read encrypted DVDs. I usually install the medibuntu repos. Then the package:

sudo wget --output-document=/etc/apt/sources.list.d/medibuntu.list http://www.medibuntu.org/sources.list.d/$(lsb_release -cs).list
sudo apt-get --quiet update && sudo apt-get --yes --quiet --allow-unauthenticated install medibuntu-keyring
sudo apt-get --quiet update
apt-get install libdvdcss2

If you are looking for more, I would advise a stop by this blog.

Creating local Debian/Ubuntu mirrors on a HDD

I will soon be in a place where internet bandwidth will be limited and I will have to upgrade about 5 workstations to the latest Ubuntu LTS. Back then in $previous_workplace, I set up debmirror back then and moved onto apt-mirror afterwards. I currently run Arch Linux on my home workstation and needed to replicate a mirror onto a harddrive. Turns out apt-mirror is actually available on the AUR repos, so just install this from there.

You will then need to set your repos in /etc/apt/mirror.list, here is mine:

set base_path    /mnt/disk/apt
deb-amd64 http://ie.archive.ubuntu.com/ubuntu precise main restricted universe multiverse
deb-amd64 http://ie.archive.ubuntu.com/ubuntu precise-security main restricted universe multiverse
deb-amd64 http://ie.archive.ubuntu.com/ubuntu precise-updates main restricted universe multiverse
clean http://ie.archive.ubuntu.com/ubuntu

You can then create the directories on your new hard drive and launch the replication, like this:

mkdir -p /mnt/disk/apt/{skel,var,mirror}
apt-mirror

All going well, it should start saying something along those lines:

[frlinux@darkangel ~]$ sudo apt-mirror
Downloading 48 index files using 20 threads...
Begin time: Sun Aug 12 18:45:16 2012
[20]... [19]... [18]... [17]... [16]... [15]... [14]... [13]... 
[12]... [11]... [10]... [9]... [8]... [7]... [6]... [5]... [4]... 
[3]... [2]... [1]... [0]... 
End time: Sun Aug 12 18:45:24 2012

Proceed indexes: [PPP]

49.9 GiB will be downloaded into archive.
Downloading 41216 archive files using 20 threads...
Begin time: Sun Aug 12 18:45:27 2012
[20]... 

Sepultura Dublin August 2012

I have loved Sepultura live 2 years ago and had lost touch with them since. Their last opus Kairos released in 2011 was not bad but left me asking for more. Man was I wrong about that statement… Their performance was indeed a bit short (1h30) but such violence though! The band has decided to mostly play new songs from recent albums but we still got treated to a few good old songs (Roots Bloody Roots still gives me goosebumps). We also had a nice cover from a Ministry song Just One Fix.

Overall an excellent gig which has left me we a sore neck, without further delay, the pictures.

Cyanogenmod experimental 10 for SGS3

Been a while since I made time to actually post about CyanogenMod. In the meantime, I happen to have changed my handset to a Samsung Galaxy S3. I tried the stock ROM for a few days and I can honestly declare it much better than previous stock ROM experiences I had on the SGS and SGS2. It however didn’t take long for me to miss CyanogenMod. So Cyanogen 9 builds have passed RC2. It is very stable and I cannot find much I miss from stock (provided you do not use HDMI to TV).

On the Cyanogen 10 front (based on JellyBean Android 4.1.x), things are progressing quickly and experimental builds are available. I do recommend you read the forum thread since this is still experimental.

Been using cm10 for a few days, the progress of the ROM is amazing on a daily basis, fixes are coming in fast and I consider it now stable enough to run it daily (fair few things I do not do with that phone like TV-OUT, if it matters to you, i recommend you use Darky instead).

Cobbler on CentOS6

I got to play with this recently at work and thought that I would write this as a reminder before I forget 🙂 First things first, you need a CentOS6 server and then install the following packages yum install cobbler dhcp. Then edit your DHCP daemon, you can use ranges but I prefer static DHCP (in this example, 192.168.66.200 is the cobbler server AND the DNS):

ddns-update-style interim;
allow booting;
allow bootp;
ignore client-updates;
set vendorclass = option vendor-class-identifier;
subnet 192.168.66.0 netmask 255.255.255.0 {
     option routers             192.168.66.1;
     option domain-name-servers 192.168.66.200;
     option subnet-mask         255.255.255.0;
     filename                   "/pxelinux.0";
     default-lease-time         21600;
     max-lease-time             43200;
     next-server                192.168.66.200;
     option domain-name         "frlinux.eu";
}
    host lucifer {
        hardware ethernet 34:66:DE:AD:BE:EF;
        fixed-address 192.168.66.66;
        option host-name "lucifer";
        option routers 192.168.66.1;
        filename "/pxelinux.0";
        next-server 192.168.66.200;
    }

Then you have to import a distro into cobbler. I have downloaded the ISO DVD for CentOS6, just should be called something like: CentOS-6.2-x86_64-bin-DVD1.iso. Then mount it like this: mount -o loop CentOS-6.2-x86_64-bin-DVD1.iso /media. It is now time to import that shit, simple one as it turns (carefully check out that it does not return any errors or you are doomed):

cobbler import --path=/media --name=CentOS6-x86_64

You should run cobbler check to make sure it all works, fix whatever it tells you to.

Provided that you have repos correctly configured, it will grab them all for you very nicely. You can then add a box:

cobbler system add --name=lucifer --profile=CentOS6-x86_64 --mac=34:66:DE:AD:BE:EF --ip-address=192.168.66.66 --subnet=255.255.255.0 --hostname=lucifer --netboot=y --gateway=192.168.66.1

At this point, you need a kickstart file, here is mine for CentOS6:

#version=RHEL6
install
# reboot after install
reboot
# textmode installer
text
# source of netinstall info
url --url=$tree
lang en_US.UTF-8
keyboard us
network --bootproto=dhcp --device=eth0 --onboot=on

$yum_repo_stanza
$SNIPPET('network_config')

rootpw  --iscrypted $encryptyourownrootpasswordrighthereasthisonewillnotwork/
firewall --disable
authconfig --enableshadow --passalgo=sha512 --enablefingerprint
selinux --disabled
skipx
timezone UTC
bootloader --driveorder=sda --append="crashkernel=auto edd=off"

clearpart --initlabel --drives=sda
part /boot --fstype=ext4 --asprimary --size=200
part swap --fstype=swap --asprimary --size=12000
part / --fstype=ext4 --fsoptions=noatime,nodiratime,logbufs=8 --asprimary --size=20000 --grow

#repo --name="CentOS"  --baseurl=http://192.168.66.200/cobbler/
repo --name="CentOS-epel"  --baseurl=http://repo.somewhere.on.the.web/6.2/epel/ 
repo --name="CentOS-updates"  --baseurl=http://repo.somewhere.on.the.web/6.2/updates/ 

%pre
$SNIPPET('log_ks_pre')
$kickstart_start
$SNIPPET('pre_install_network_config')
# Enable installation monitoring
$SNIPPET('pre_anamon')
%end

%packages
@core
@server-policy
$SNIPPET('func_install_if_enabled')
yum
openssh-server
openssh-clients
pam
screen
man
wget
vim-enhanced
bind-utils
mlocate
parted
nano
ntpdate
%end

%post
$yum_config_stanza
$SNIPPET('post_install_kernel_options')
$SNIPPET('post_install_network_config')
$SNIPPET('func_register_if_enabled')
$SNIPPET('download_config_files')
$SNIPPET('koan_environment')
$SNIPPET('redhat_register')
$SNIPPET('cobbler_register')
$SNIPPET('post_anamon')

export PATH=/usr/bin:/bin:/usr/sbin:/sbin
$SNIPPET('log_ks_post')

### Repo Setup ###
rm -f /etc/yum.repos.d/CentOS*
rm -f /etc/yum.repos.d/cobbler-config.repo
cat <<-EOF > /etc/yum.repos.d/CentOS-Base.repo
	[base]
	name=CentOS-$releasever - Base
	baseurl=http://repo.somewhere.on.the.web/6.2/base
	enabled=1
	gpgcheck=0

	[updates]
	name=CentOS-$releasever - Updates
	baseurl=http://repo.somewhere.on.the.web/6.2/updates
	enabled=1
	gpgcheck=0

	[epel]
	name=CentOS-$releasever - EPEL
	baseurl=http://repo.somewhere.on.the.web/6.2/epel
	enabled=1
	gpgcheck=0
EOF
### Sync Time ###
ntpdate ntp.hea.net
$SNIPPET('kickstart_done')
%end

All going well cobbler sync should not return any errors. I would also check that all the system kickstart works, you can use the following:

cobbler system getks --name=lucifer

As a bonus, here is a configuration for centos6 VMs, copy that file under /var/lib/cobbler/kickstarts/centos6-vm.ks

#version=RHEL6
install
# reboot after install
reboot
# textmode installer
text
# source of netinstall info
url --url=$tree
lang en_US.UTF-8
keyboard us
network --bootproto=dhcp --device=eth0 --onboot=on
$yum_repo_stanza
$SNIPPET('network_config')

rootpw  --iscrypted $replacewithawesomerootpasswordinencryptedform/
firewall --disable
authconfig --enableshadow --passalgo=sha512 --enablefingerprint
selinux --disabled
skipx
timezone UTC
bootloader --driveorder=vda --append="crashkernel=auto edd=off"
# Boot/Disk configuration
bootloader --location=mbr
zerombr
clearpart --all --initlabel
%include /tmp/partition-setup

repo --name="CentOS-epel"  --baseurl=http://repo.somewhere.on.the.web/6.2/epel
repo --name="CentOS-updates"  --baseurl=http://10.16.1.107/6.2/updates

%pre
#raw
#!/bin/bash

set $(list-harddrives)
FIRSTDEV=$1
cat <<endpart > /tmp/partition-setup
part /boot --fstype=ext4 --asprimary --size=200
part swap --fstype=swap --asprimary --size=2048
part / --fstype=ext4 --fsoptions=noatime,nodiratime --asprimary --size=20000 --grow
endpart
#end raw
$SNIPPET('log_ks_pre')
$kickstart_start
$SNIPPET('pre_install_network_config')
# Enable installation monitoring
$SNIPPET('pre_anamon')
%end

%packages
@core
@server-policy
$SNIPPET('func_install_if_enabled')
yum
openssh-server
openssh-clients
pam
screen
man
wget
vim-enhanced
bind-utils
mlocate
parted
puppet
nano
ntpdate
%end

%post
$yum_config_stanza
$SNIPPET('post_install_kernel_options')
$SNIPPET('post_install_network_config')
$SNIPPET('func_register_if_enabled')
$SNIPPET('download_config_files')
$SNIPPET('koan_environment')
$SNIPPET('redhat_register')
$SNIPPET('cobbler_register')
$SNIPPET('post_anamon')

export PATH=/usr/bin:/bin:/usr/sbin:/sbin
$SNIPPET('log_ks_post')

### Repo Setup ###
rm -f /etc/yum.repos.d/CentOS*
rm -f /etc/yum.repos.d/cobbler-config.repo
cat <<-EOF > /etc/yum.repos.d/CentOS-Base.repo
	[base]
	name=CentOS-$releasever - Base
	baseurl=http://repo/centos6
	enabled=1
	gpgcheck=0

	[updates]
	name=CentOS-$releasever - Updates
	baseurl=http://repo/centos6-updates
	enabled=1
	gpgcheck=0

	[epel]
	name=CentOS-$releasever - EPEL
	baseurl=http://repo/centos6-epel
	enabled=1
	gpgcheck=0
EOF

### Sync Time ###
ntpdate ntp.hea.net
$SNIPPET('kickstart_done')
%end

Last but not least, say you are using console for your servers, you can change this easily by doing: cobbler profile edit –name=CentOS6-x86_64 –kopts=”console=ttyS1,115200n8″

That’s all kids, have fun!
Comicflow on iPad using webdav

I have some comics in .cbr .cbz format I wanted to transfer to read on my iPad on the go. I looked for a few comics clients and settled on an opensource and free one called comicflow (if you are interested, you can find the sources here).

So the cool thing about this app is no need for iTunes hell, you can just use webdav to connect to it. Under linux, being a command line nut, i used cadaver. This is as simple as typing: cadaver http://192.168.6.66:8080, then input the password shown by comicflow and voila, it will start transferring.

If you install davfs2 you can rsync your stuff directly on the server, all you need to do is add a mountpoint in /etc/fstab such as http://192.168.6.66:8080 /mnt/dav davfs noauto,user 0 0 and you can mount it directly on your linux. Beware that it DOES NOT support locks.