gmvault, claim your mail back.

It has been a while since I have written a post on this blog. I recently got back into looking at how to backup my gmail accounts, just in case, because paranoia, you know…

As I thought I had seen back then, you cannot use Google takeout. I am unsure why exactly but the end result is that I needed a solution. There are a lot of defunct projects out there but an active one that is quite cool: GMVault.

Not only can this thing backup your mail on regular basis (note that if you use 2 factor auth, you will need to create an application password to allow gmvault to download all your mails), it can also export them to mbox/maildir.

You can of course take a look at the install guide for further details, i just went for the source install (using FreeBSD here) by doing:

tar xvf  gmvault-1.8.1-beta
python setup.py install

You can then start using the program straight away, to back your mail account up, just use:

gmvault sync --passwd emailaccount@gmail.com

Once this is finished, you can easily export this onto a Maildir account:

gmvault export -d location_of_your_gmvault-db -t maildir /where/to/export/

This worked well for me bar one issue, my dovecot/roundcube install decided not to see the folder, this fixed it:

for i in `ls -d */`; do mv $i .$i; done

I have donated money to this project because they are worth it, if gmail shutdowns for me tomorrow, i have a full backup of my mails on a server I own.

New shiny server!

So imagine my surprise when a friend gave me a link to my current hoster and got me to find a nice server with twice the amount of RAM, twice the hard disk space, bigger CPUs for 5 euros less per month 🙂

And this is how you are now reading this on the new server! I took the opportunity to migrate from Debian 7.0 to FreeBSD 9.1 since I wanted to go back to FreeBSD for a while.

Loving the speed and glad to BSD a bit more! Hoping I can post more than I did over the last few months.

FreeBSD behemoth 9.1-RELEASE-p4 FreeBSD 9.1-RELEASE-p4 #0: Mon Jun 17 11:42:37 UTC 2013

Booting XBMC OpenELEC with NFS storage

I have had a raspberry pi type B for a few weeks now and one problem that I have is on the SD card which can get stressed and corrupt XBMC data. I was looking for a solution tonight and eventually stepped on it reading a few pages from the wiki. Since I still want to use the SD card, I just changed /flash/cmdline.cfg to contain this:

ip=dhcp boot=/dev/mmcblk0p1 disk=NFS=192.168.0.66:/media/xbmc

Of course, you will need to change the NFS server and mount point as they are likely to be different. Worth noting that I rsync’d the content of /dev/mmcblk0p2 (/storage in OpenELEC) so I would not have to scan my whole collection again.

There is also a full procedure to netboot your Raspberry Pi but this did not appeal to me, details there.

Nexus 4 first thoughts and random shit

It has been almost 5 days that I have ditched my Samsung S3 for a Nexus 4. I have had time to witness issues and other things, so what do have to say after almost a week of usage. During the week, 4.2.2 dropped by OTA, I have yet to see the benefits but it can only be better right!?

Well, the bad news first, as previously mentioned, the camera is definitely sub par compared to the S3, it does not matter too much since I don’t make an big use of it. I got mostly used to the screen compared to the S3, definitely not as shiny but I am starting to mind less about it. I had an issue with trying to enable bluetooth to connect to my speakers, a reboot fixed that. That is all I can think on the bad news really.

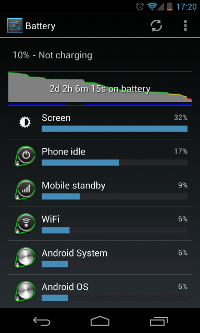
On the upside, the battery life is just stellar… I got 2 days and 2h+ on a single charge with 5h on screen mostly watching videos, browsing the web and listening to music, this is in line with the battery I was getting on the Samsung S3 using Cyanogenmod 10.1

The speed of the device is amazing enough to mention again, it really really kicks ass. I have yet to find smoother and faster. I recall using Jellybean on a Nexus 7 and thinking that it would be nice if my phone could be that snappy, well it is!

I dropped the phone already once, and was very happy to have purchased that cover. I am fairly sure it saved its skin (dropped off a meter onto tiles).

I read on the internet about hardware revisions. Apparently back in November, revision 10 shipped out and had some hardware issues, that got solved in February by revision 11 (the unit i got). A revision 12 is under wraps apparently. But so is the life of a device, never get the first. You can check which one you have by shutting down the phone then pressing simulteanously volume down + power.

So after a few days, I am strongly confident I made the right choice, amazing device. Thank you Google for making a stock device so nice to use!

A day with the Nexus 4

As I mentioned to a few people, I have abandoned my Samsung Galaxy S3 for a Google Nexus 4 (the one made by LG). As for Samsung, I will never buy their devices again, they do not care about opening their Exynos platform and provide updated sources. Cyanogenmod has been playing catch up game for so long now it is no longer funny. Stock ROMs are just a joke, laggy and over crippled with bloatware. So in short, goodbye Samsung, you lost a customer.

I had been thinking about getting a stock device for a while, eventually caved in for the Nexus 4. Setup was a breeze, first boot upgraded the firmware for 4.2 to 4.2.1 over the air. That brings it to the same software version as I used on Cyanogen on the S3. I will start with the things I miss from the S3.

  • Notification led: Definitely better on the S3, the Nexus 4 one is very small and not so bright, also at the bottom of the phone, not the best place
  • Screen: I knew this one before buying the device, screen is much better on the S3, but again, I should get used to it, it is still quite stunning
  • Soft buttons: Force of habbit I guess but I like physical buttons better, and been used to them for a long time on the Galaxy series

Now onto the PROS:

  • Speed: That one was a given but I have been stunned by how quick the device feels.
  • Stock firmware: I had a taste with Cyanogen but stock feels even better, no extra software, pure Google experience
  • Battery life: I get quite a strong battery life and no drain over night even with wifi left on
  • Price: Back then the S3 was at 600 euros, the Nexus 4 16GB set me for 350 euros, difficult to fault it there

So far this is all I have to say about the phone, liking it a lot and not even planning to root it for now. There is a Cyanogen thread for the Nexus 4 but I would advise against it for now. I have read a fair bit of entries in there and there still are a few nagging issues compared to stock.

Last but not least, you can always recover stock by downloading from Google itself should you need to.

UPDATE : 4.2.2 was delivered to me OTA yesterday. Feels as good as previous version. For benefits and changes, take a look at this article: 4.2.2 screenshot comparison.

Configuring OSSEC with MySQL and Analogi

I have been using OSSEC for a while now but I always used only plain text logs. While this is not bad, it does not scale really well. I started looking into a way to do it right(tm). I knew OSSEC was compatible with MySQL, and since 2.7 has been released, it gave me an excuse to play with it again.

You will need to enable MySQL in OSSEC (not enabled by default), grab the source then do the following. Note that if upgrading an existing installation, you might want to save the registered client keys, the file to back up is: /var/ossec/etc/client.keys

cd ossec-hids-2.7/src
make setdb
cd ..
./install.sh

After you have completed the installation, you need to configure your MySQL server, I used the official documentation to do it. Here is my run down of it:

$ mysql -u root -p
mysql> create database ossec;
mysql> grant INSERT,SELECT,UPDATE,CREATE,DELETE,EXECUTE on ossec.* to ossecuser@<ossec ip>;
mysql> set password for ossecuser@<ossec ip>=PASSWORD('ossecpass');
mysql> flush privileges;
mysql> quit
mysql -u root -p ossec < ./src/os_dbd/mysql.schema

You just now need to edit /var/ossec/etc/ossec.conf and add a new section within the config:

  <database_output>
        <hostname>127.0.0.1</hostname>
        <username>ossecuser</username>
        <password>xxxxxxx</password>
        <database>ossec</database>
        <type>mysql</type>
    </database_output>

And at last, enable MySQL and restart the service:

/var/ossec/bin/ossec-control enable database
/var/ossec/bin/ossec-control restart

Analogi is a web interface replacement to ossec-wui which is now very dated and spurts too many false positive. To install analogi, go to the main project page and clone it using git:

git clone git://github.com/ECSC/analogi.git

It is up to you to protect that folder on your webserver as this has potential security risks, I am using NGINX, so here is my setup:

        location /ossec/analogi {
                auth_basic "Restricted Access";
                auth_basic_user_file htpasswd-file;
        }

You then need to rename the config file and change the SQL information

mv db_ossec.php.new db_ossec.php

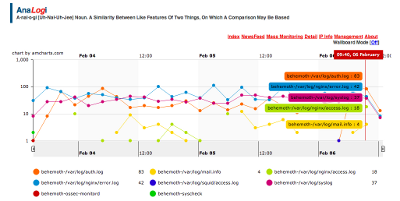
You should now be able to see information gathered from different clients straight into MySQL and using Analogi.

Protecting your blog with NAXSI

I have been pondering how to make wordpress more secure. This is when i stepped on NAXSI. This is a WAF developed specifically for nginx. As it happens, i am providing an nginx debian package for squeeze that I plan to update. So here is the package for nginx 1.2.6 (amd64) built against naxsi 0.48. I am using Debian Squeeze as a server.

First, credits where they are due, I based my blog entry on the blog entries of 2 friends: Guigui and iMil.

You will need to edit /etc/nginx/nginx.conf and add:

http {
    include        /etc/nginx/naxsi_core.rules;
}
server {

        listen 80;
        listen [::]:80; #only if you are using ipv6
        server_name  weblog.frlinux.net;
        root /where/your/awesome/blog/is;
        proxy_set_header Proxy-Connection "";
        location /RequestDenied {
                return 403;
        }
        location / {
                index  index.html index.php;
                include    /etc/nginx/naxsi.rules;
        }

Then add the following file: /etc/nginx/naxsi.rules with this:

SecRulesEnabled;
DeniedUrl "/RequestDenied";

## check rules
CheckRule "$SQL >= 8" BLOCK;
CheckRule "$RFI >= 8" BLOCK;
CheckRule "$TRAVERSAL >= 4" BLOCK;
CheckRule "$EVADE >= 4" BLOCK;
CheckRule "$XSS >= 8" BLOCK;

# WordPress naxsi rules

### HEADERS
BasicRule wl:1000,1001,1005,1007,1010,1011,1013,1200,1308,1309,1315 "mz:$HEADERS_VAR:cookie";
# xmlrpc
BasicRule wl:1402 "mz:$HEADERS_VAR:content-type";

### simple BODY (POST)
# comments
BasicRule wl:1000,1010,1011,1013,1015,1200 "mz:$BODY_VAR:post_title";
BasicRule wl:1000 "mz:$BODY_VAR:original_publish";
BasicRule wl:1000 "mz:$BODY_VAR:save";
BasicRule wl:1008,1010,1011,1015 "mz:$BODY_VAR:sk2_my_js_payload";
BasicRule wl:1009,1005,1100,1310 "mz:$BODY_VAR:url";
BasicRule wl:1009,1100 "mz:$BODY_VAR:referredby";
BasicRule wl:1100 "mz:$BODY_VAR:_wp_original_http_referer";
BasicRule wl:1000,1001,1008,1009,1010,1011,1013,1015,1016,1100,1200,1302,1303,1310,1311,1315,1400 "mz:$BODY_VAR:comment";
BasicRule wl:1100 "mz:$BODY_VAR:redirect_to";
BasicRule wl:1000,1009,1315 "mz:$BODY_VAR:_wp_http_referer";
BasicRule wl:1000 "mz:$BODY_VAR:action";
BasicRule wl:1001,1013 "mz:$BODY_VAR:blogname";
BasicRule wl:1015,1013 "mz:$BODY_VAR:blogdescription";
BasicRule wl:1015 "mz:$BODY_VAR:date_format_custom";
BasicRule wl:1015 "mz:$BODY_VAR:date_format";
BasicRule wl:1015 "mz:$BODY_VAR:tax_input%5bpost_tag%5d";
BasicRule wl:1100 "mz:$BODY_VAR:siteurl";
BasicRule wl:1100 "mz:$BODY_VAR:home";
BasicRule wl:1000 "mz:$BODY_VAR:submit";
# news content matches pretty much everything
BasicRule wl:0 "mz:$BODY_VAR:content";
BasicRule wl:1000 "mz:$BODY_VAR:delete_option";
BasicRule wl:1000 "mz:$BODY_VAR:prowl-msg-message";
BasicRule wl:1100 "mz:$BODY_VAR:_url";
BasicRule wl:1001 "mz:$BODY_VAR:c2c_text_replace%5btext_to_replace%5d";
BasicRule wl:1200 "mz:$BODY_VAR:ppn_post_note";
BasicRule wl:1100 "mz:$BODY_VAR:author";

### BODY|NAME
BasicRule wl:1000 "mz:$BODY_VAR:delete_option|NAME";

### Simple ARGS (GET)
# WP login screen
BasicRule wl:1100 "mz:$ARGS_VAR:redirect_to";
BasicRule wl:1000,1009 "mz:$ARGS_VAR:_wp_http_referer";
BasicRule wl:1000 "mz:$ARGS_VAR:wp_http_referer";
BasicRule wl:1000 "mz:$ARGS_VAR:action";
BasicRule wl:1000 "mz:$ARGS_VAR:action2";
# load and load[] GET variable
BasicRule wl:1015 "mz:$ARGS_VAR:load";
BasicRule wl:1015 "mz:$ARGS_VAR:load[]";
BasicRule wl:1015 "mz:$ARGS_VAR:q";

### URL
BasicRule wl:1000 "mz:URL|$URL:/wp/wp-admin/update-core.php";
BasicRule wl:1000 "mz:URL|$URL:/wp/wp-admin/update.php";
# URL|BODY
BasicRule wl:1009,1100 "mz:$URL:/wp/wp-admin/post.php|$BODY_VAR:_wp_http_referer";
BasicRule wl:1016 "mz:$URL:/wp/wp-admin/post.php|$BODY_VAR:metakeyselect";
BasicRule wl:11 "mz:$URL:/wp/xmlrpc.php|BODY";
BasicRule wl:11 "mz:$URL:/wp/wp-cron.php|BODY";
# URL|BODY|NAME
BasicRule wl:1100 "mz:$URL:/wp/wp-admin/post.php|$BODY_VAR:_wp_original_http_referer|NAME";
BasicRule wl:1000 "mz:$URL:/wp/wp-admin/post.php|$BODY_VAR:metakeyselect|NAME";
BasicRule wl:1000 "mz:$URL:/wp/wp-admin/user-edit.php|$BODY_VAR:from|NAME";
# URL|ARGS|NAME
BasicRule wl:1310,1311 "mz:$URL:/wp/wp-admin/load-scripts.php|$ARGS_VAR:load[]|NAME";
BasicRule wl:1000 "mz:$URL:/wp/wp-admin/users.php|$ARGS_VAR:delete_count|NAME";

There is a learning mode that you can enable to train your application, I would suggest you download the following script then take a look at Guigui’s article. I just focused on a ready to go configuration.

This configuration works on the latest Debian Squeeze using the latest packaged wordpress, of course YMMV. I have deployed this about 2 weeks ago and is proving quite nice in terms of security. It protects 2 blogs on my main server.
Steam on Linux using Arch and Nvidia drivers

I have been testing Steam on Linux with no great deal of success on Arch compared to Ubuntu. I stepped onto that error today your video card is unsupported, or your OpenGL driver needs to be updated. This returned an interesting solution on the steam community forums. What fixed it for me was: sudo pacman -S lib32-nvidia-utils. Happy Fragging!

Happy New Year 2013!

This is that time of the year again. I have gathered some quick starts like last year, I have posted in average twice as less this year with only 15 entries (41 in 2011), visits have steadily stayed around 11k to 12k per month (while hits reached around 80.000 per month). This shows me that i need to post more interesting stuff. I have lined up a fair few tech stuffs i want to talk about so stay tuned…

Happy New Year to y’all 🙂