Docker on Debian Wheezy

I recently got to play with Docker at work and thought, what would it take to get that running on a Debian stable system like Wheezy. In short, surprisingly little if you are not afraid to install a more recent, less tested kernel.

So I guess, let’s start and see what is involved. I decided to follow this Ubuntu installation guide directly from Docker. Due to a bug in Docker, kernel 3.8 or above is advised, so I installed the Debian backports repo. To do so, edit /etc/apt/sources.list and add:

# backports for new kernel
deb http://ftp.debian.org/debian/ wheezy-backports main non-free contrib
# Docker Repo
deb https://get.docker.io/ubuntu docker main 

Then install the newer kernel by doing:

apt-get update
# needed for the Docker repo
apt-get install apt-transport-https
# key for that repo
apt-key adv --keyserver hkp://keyserver.ubuntu.com:80 --recv-keys 36A1D7869245C8950F966E92D8576A8BA88D21E9
# install new kernel
apt-get -t wheezy-backports install linux-image-amd64 linux-headers-amd64
reboot # last step will reboot your box but you guessed it

Once you have rebooted, check your kernel version to make sure you rebooted on the right one. Then it is time to install the Docker repo and install the software. We edited the repo before and added the key for Docker, so all that remains to be done is:

apt-get install lxc-docker

At this point, you should see the Docker service starting by itself and have a working docker host ready to install all the wonders in the world. You can do a quick check by typing:

# docker version
Client version: 1.1.1
Client API version: 1.13
Go version (client): go1.2.1
Git commit (client): bd609d2
Server version: 1.1.1
Server API version: 1.13
Go version (server): go1.2.1
Git commit (server): bd609d2

If you need convincing on what Docker can do for you, head to their official documentation to get started. I would also suggest you take 10 minutes to look at Docker at Spotify

Enabling HDMI sound on an ion2 motherboard for XBMC

A friend of mine gave me a nice home made HTPC. I had forgotten the joy of setting up sound and video on Linux. I ended up installing Ubuntu 14.04 LTS with the latest XBMC 13.0 but the part that really was troublesome was to get the sound working.

Turns out PulseAudio tries to be too clever about this, it detected the wrong output. I eventually found a solution on this thread.

In short, edit /etc/pulse/default.pa and added this line:

load-module module-alsa-sink device=hw:1,7

Of course, this will depend on your device, to see what you have, do aplay -l

Installing Skyline to monitor graphite

I had heard of that project a while back and was curious to give it a go, with this weekend, I ended up having a bit of time to test this. Skyline is a project created by etsy which is designed to monitor automatically graphs and detect anomalies.

I would have normally used a CentOS 6 installation to test this but it turns out that the requirements are actually quite important in terms of dependencies. You will need fairly recent versions of packages to make this work. This is why I ended up using Ubuntu (14.04 LTS at the time of writing).

You can choose to use pip in order to install dependencies but I preferred to use the distribution’s packages instead. If that works for you, here’s what you need to install:

apt-get install python-numpy python-scipy python-pandas \
python-patsy python-statsmodels python-msgpack \
python-unittest2 python-mock python-simplejson \
python-hiredis redis-server python-daemon python-flask

Next, you need the latest version of skyline, you will need git installed for this, you can just do:

apt-get install git-core 
cd /opt
git clone https://github.com/etsy/skyline.git
cd skyline
cp src/settings.py.example src/settings.py
cp src/redis.conf /etc/redis/ # copying redis skyline config
mkdir /var/log/skyline /var/dump /var/run/skyline
chown -R redis /var/lib/redis/ 
service redis-server restart # important

You will need to modify the port and address if like me you are not using the same machine, then you can start the daemons. There is two things I fell into when i started them: first, make sure your host has its correct name and ip in /etc/hosts, horizon will get upset if you don’t. Second, also make sure that in the settings.py you will have to replace 127.0.0.1 by 0.0.0.0 if you want to be able to connect to the webapp outside of your machine. Last but not least, change the value of the http interface to point to your graphite instance, failing this, not much analysis can happen. Also note that you have to run the web interface on port 80, using anything different will fail.

Time to start it all:

cd /opt/skyline
bin/horizon.d start
bin/analyzer.d start
bin/webapp.d start

If at any point starting these daemons you have an issue, you are on your own, use the logs. I have included in the commands above all the issues I had, so you should be alright starting all the daemons.

You will need to direct your graphite metrics to a relay for duplication, this is nicely explained here.

You can also do a check to make sure it’s all good, luckily for you, the project includes a little utility to test this.

/opt/skyline# python utils/seed_data.py
Loading data over UDP via Horizon...
Connecting to Redis...
Congratulations! The data made it in. 
The Horizon pipeline seems to be working.

Installing Suricata 2.0 on Debian with JSON support

A few months ago, I wrote a blog entry worth reading if you lack context on installing Suricata on Debian with banyard and syslog support. During my original research, Suricata 2.0 was under development but has since been released. What is very interesting about this is its JSON support.

I am using Debian Wheezy but I did not want to install from sources nor upgrade to sid. So I ended up recompiling libhtp1 and suricata 2.0 for wheezy, which you can now download right here:

These packages have been compiled on my own wheezy server with latest patches installed. I have also installed libjansson4 and compiled suricata 2.0 with JSON support (Debian suricata on wheezy disables JSON support by default).

It will then allow you to output JSON directly to a file, I advise you to take a look at that link on Logstash Kibana and Suricata JSON output if you need more information on how to enable this with your logstash/kibana installation.

You can install some nice dashboards for suricata to use in Kibana, I have been using these ones lately.

I will write a bit later on tidying your alerts.

A week with the Tado

Well almost, in 2 days it will be, but I feel I have enough evidence to write up a quick review of the beast. So Tado is a concurrent to nest which you can purchase for most houses/apartments depending on the boiler you have. It is a thermostat unit for your boiler. It is highly recommended you go through the site to confirm that your setup is compatible.

My device took a while to arrive because after Christmas, Tado became really popular and they started to have an impressive (several weeks) backlog of orders. Eventually I received this.


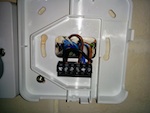
I had a little trouble with the wiring due to the fact that my house is not exactly what you would call standard, so when I followed the wiring examples from the website, it just did not work for me. This is also because I can only heat water at the same time as the boiler is on, there is no separated pipes. After dealing with support, they were a bit slow in providing me with the right wiring, I ended up giving a call to my electrician to figure this out, the result being here.


Once this is wired right, you can put the cover back on and check on the website that all the bits are working. In fairness, apart from the minor setback in wiring, it is a piece of cake to install. You register the device with the user/password written on the card in the box.
You can then setup our phone or any other tablet to register with tado, this will allow tado to use geo location to save on power/heating when you are outside your home. The website interface reports at all times on the current temperature inside and also the weather report that it is supposed to use for intelligent heating.


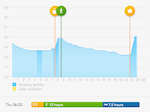
The reporting is fairly straight forward, it is able to tell you at a glance how much heating it had to do (dark blue patterns on the graph), how long you were away on a given day and other useful information. For heating, there are two main settings for the device: savings or comfort. Savings is when you want to spend at least as possible on your bill, so it will not heat straight away when it detects you are moving home whereas comfort will be much snappier to react. I chose savings because I do not mind that the house will take slightly longer to heat up.


You can also set temperatures for normal operations and sleep, on the web interface or your phone. The phone application is quite responsive and intuitive, it will notify you of current status and will change colors to let you know which mode is it in, like below in away mode when you step out of your place.


It will also change context when the night comes, depending on when you have set up your sleeping hours. I have decided to go for custom times depending on the days as I do not wake up at the same time regularly. You can also override all settings to manual and just heat up the place if you need to, there is a button on the device itself, or you can control this using the application or the web interface.


I bought the tado to finally replace my timer with a clever thermostat and it does just that and very well. In the end, I am unsure if it will cost me a bit more than it used to mostly because i used to heat up the house 3h per day, and I think at the moment it heats up for slightly longer than that. That said, having a house that is at the right temperature all the time and reporting on energy consumption is quite good.

Very happy about the purchase. I have asked about a timer functionality for summer so i can heat up my water a couple hours a day but no response so far.

Installing Suricata, Snorby and Banyard2 on Debian

I have used Snort quite extensively in the past and was curious about toying with Suricata which is similar to Snort but nicer in my view. It has been a few years since I looked at it. I can see the project seems to have evolved quite a lot. One functionality that I will be using down the line will be PF Ring.

On a lazy Sunday afternoon, I thought this was the perfect time to take a look at what it can do in its current form. I used Debian 7.3 for my tests. Everything is packaged which is quite nice though the version of suricata is a bit old on this (1.2.1 vs 1.4.7 on the website). I am very likely to make packages for this later in order to have more functionality.

Once you have done the traditional apt-get install suricata, there is not much to do to get it running, mostly edit: /etc/default/suricata and change this line depending on your network interface, and also allow it to run:

# set to yes to start the server in the init.d script
RUN=yes
# Interface to listen on (for pcap mode)
IFACE=br0

You then should grab the rules to get it all going and monitoring, check out the official page to set this up. I edited /etc/oinkmaster.conf to add the rules I wanted:

url = http://rules.emergingthreats.net/open/suricata/emerging.rules.tar.gz

You now need to grab the rules, a quick mkdir /etc/suricata/rules && oinkmaster -C /etc/oinkmaster.conf -o /etc/suricata/rules should fix this, and give you something like this:

~ # oinkmaster -C /etc/oinkmaster.conf -o /etc/suricata/rules
Loading /etc/oinkmaster.conf
Downloading file from http://rules.emergingthreats.net/open/suricata/emerging.rules.tar.gz... done.
Archive successfully downloaded, unpacking... done.
Setting up rules structures... done.
Processing downloaded rules... disablesid 0, enablesid 0, modifysid 0, localsid 0, total rules 18195
Setting up rules structures... done.
Comparing new files to the old ones... done.
Updating local rules files... done.
[***] Results from Oinkmaster started 20140119 18:15:26 [***]
[*] Rules modifications: [*]
    None.
[*] Non-rule line modifications: [*]
    None.
[+] Added files (consider updating your snort.conf to include them if needed): [+]

    -> botcc.rules
...snip...
    -> unicode.map

Restart the thing with a simple service suricata restart and there you are, you can leave it running on your system to learn what kind of traffic is happening. It is worth noting that default rules are set to PASS to avoid messing your traffic up. It is up to you to tune this the right way(tm).

Snorby is a web interface that allows you see events in a nice web inteface. It will require a few things to work nicely, which you can install prior by doing: apt-get install bundler libxml2-dev libxslt-dev libmysqlclient-dev graphviz-dev libgv-ruby wkhtmltopdf.

Before you execute the next commands, be careful with your snorby_config.yml file and set your domain to a secure domain and random port, since this is a ruby on rails application, unless you plan on proxying it behind a http server. My 2 cents, opinions my own, etc…

cd /opt
git clone http://github.com/Snorby/snorby.git
cd snorby
bundle install
cp database.yml.example database.yml
cp snorby_config.yml.example snorby_config.yml
vi snorby_config.yml
cd initializers/
vi mail_config.rb
bundle exec rake snorby:setup
bundle exec rails server -e production

Now you need to set up a parser between the suricata logs and the snorby interface, this is where banyard2 comes in. The new version is hosted on github. You will need a few things to get it compiled right.

cd /opt
git clone https://github.com/firnsy/barnyard2.git
cd /opt/barnyard2/
apt-get install dh-autoreconf libpcap-dev
# check out where your MySQL libs are before specifying the same folder
./configure --with-mysql-libraries=/usr/lib/x86_64-linux-gnu/
make 
make install

If there were no errors, you should have a nice running setup, time to configure it to send stuff to MySQL. Edit /usr/local/etc/barnyard2.conf and change the following:

# set the appropriate paths to the file(s) your Snort process is using.
config reference_file:      /etc/suricata/reference.config
config classification_file: /etc/suricata/classification.config
config gen_file:            /etc/snort/gen-msg.map
config sid_file:            /etc/snort/community-sid-msg.map

# define the full waldo filepath.
config waldo_file: /var/log/suricata/suricata.waldo

# database: log to a variety of databases
output database: log, mysql, user=snorbydbuser password=snorbydbpassword dbname=snorbydbname host=localhost

You should then be able to start it and check that it works, if it does, then you can use -D to run as a daemon.

touch /var/log/suricata/suricata.waldo
 1234  barnyard2 -c /etc/suricata/barnyard2.conf -d /var/log/suricata/ -f unified2.alert -w /var/log/suricata/suricata.waldo -d

More on this when I have time 🙂

Installing emoncms on your home server

I have started to look into home automation and graphing energy consumption. There is a plethora of proprietary solutions out there which of course are in my view not ideal. I stumbled across this project: OpenEnergyMonitor which seems to tick all the boxes. The main criteria for me is OpenSource so I can export my data any way I see fit.

I have placed an order on some hardware that they sell, initially to monitor my electrical consumption but also temperature and humidity levels. I am planning to add central heating controls at a later stage.

This first post is to breakdown the installation of the software on a normal Linux server. Obviously, I am assuming you know Linux a bit and you already have a LAMP installation somewhere. The following instructions are for CentOS 6.x, you can also find full instructions here. Also, I am not touching on security, so it is up to you to secure your setup any way you see fit.

You will need redis and MySQL especially based on this test.

You can start by installing the required backend and checkout the latest sources:

git clone https://github.com/emoncms/emoncms.git

Then copy the default settings file in the folder and edit to match your MySQL configuration (you will need to create a default database for the project in MySQL). Then change the following settings:

  $username = "yourluser";
  $password = "yourpass";
  $server   = "yourserver";
  $database = "yourdatabasename";
  $default_engine = Engine::MYSQL;

You will need the EPEL repository to install redis, like doing so:

yum install redis php-redis
service redis start
chkconfig redis on

This should allow you to head to your vhost on your local server and register for a new account, this will by default become an admin account, so treat accordingly.

I will add more on redis and the setup of the devices whence I receive them.

Nexus 5

It was only a few months ago (February 2013) when I got the Nexus 4, a device I truly loved. Being the Android fanboy that I am, when Google uncovered the Nexus 5 at the beginning of the month, I could not resist. In fairness, if you compare them side by side, they might not be that different after all, but what mostly caught my attention was a promise for much faster CPU, better and bigger screen with 1080p resolution, better camera. That is about it.

I read two reviews before deciding to order, the one from EnGadget and the one from The Verge. My main gripes with the Nexus 4 were the camera and the screen quality. I am glad to report that these have been fixed, at least to my standards.

Again, you get google stock Android which is nice. Kitkat needs a bit of tuning though which I expect to see happening quickly. Once you tame the Location service and disable Google Now, the device performs wonderfully on saving battery. In my normal day to day usage, I reach something similar to the Nexus 4, about 2 days uptime and 5 hours screen on time.

Google also managed to create a very sexy device. The Nexus 5 feels nicer in hand than the previous Nexus, managing to go beyond my expectations on this one. The device is also amazingly fast, like really blazing fast. This is quite amazing, the change in CPU really makes the difference. I will be curious to see how fast the Nexus 4 will be on kitkat whence the update is available.

So, no regret.

Fix you laptop GPU with a 26 euros heat gun

This post exists thanks to a friend of mine, Alexandre. I have an old trusty Sony Vaio laptop (FZ11Z) which one day froze while reading a video then displayed green and purple lines. After a few reboots, that was permanent, happening from bios screen to Windows. A good way to find out what was going on is to go into Device Manager where it reports an error 43, which means that it disabled the device acceleration and reverted back to a plain VGA driver. This is how it looked like when faulty:


I was about to order a 200 euros motherboard to replace this since my diagnostic was busted GPU which is unfortunately soldered onto the motherboard. This is when Alex made me aware of a condition that affects most Sony laptops of that generation.

The fix is to get a heat gun, I got this one in Argos. You will need to take the cover and screws out to expose the back of the laptop. You will need to unscrew all the heat sinks around the CPU and the GPU to expose them. The NVIDIA GPU is the one on the right handside:


Make sure you cover everything around where you are going to blow hot air to avoid melting any other parts. I used 2 layers of cling film (alloy), like this:


Heat this with a heat gun for about 2mn at 300 degrees celsius. Point the gun downwards with a distance of at least 15cm, to avoid burning the chip, then let it cool down for at least 30mn.

This is it, fixed my laptop in no time, here is a video of a boot after the manipulation 🙂 Fixing a motherboard with a 26 euros tool versus ordering a new motherboard for 200 euros, feels good 🙂

Safely overclocking your Raspberry Pi

Safely might be a slight overstatement but I have been in the overclocking business for a long time now. I did not really consider overclocking my Raspberry until I read some post than claimed that OpenElec (which is what I use) had gained some serious speed by doing so.

My hardware is a Raspberry Pi Type B, so your mileage may vary, you should always be extra careful before changing stock settings. You should also read the overclocking guide. Unlike the copy/paste values in the link, I have not over volted the device because, it is very bad for hardware if you don’t need to and, you will lose your warranty.

So I ended up picking slightly safer settings, you will first need to SSH to the device then remount the flash partition with write permissions

mount -o remount,rw /flash

Then edit the file in /flash/config.txt and uncomment the following lines and change the values like this:

arm_freq=850
core_freq=325
sdram_freq=425

Then save and reboot the device. You can check the running speed of the CPU by doing cat /sys/devices/system/cpu/cpu0/cpufreq/scaling_cur_freq or vcgencmd measure_clock arm.

The beauty of it is that it is dynamic overclocking so only when the device needs speed will it boost, especially during boot, scan of libraries and parsing of medias. When playing movies, unless it lags, it will remain at 700Mhz.

Happy watching!